Showing posts with label Android Beginner. Show all posts

Wednesday 25 September 2013

Upload a file to SERVER(Remore database) -Android Example

// siddhu vydyabhushana // 2 comments

 In this example uploading an image from sdcard to web server.
Steps :
      1.  place an image on sdcard.
      2.  place sdcard image path and image name in UploadToServer.java. ( see below )
      3.  create a php script (UploadToServer.php) at server. ( see below )
      4.  place php script path in UploadToServer.java. ( see below )
      5.  create folder name uploads on server where you have placed php script.
      6.  give permission 777 (read/write/execute) to uploads folder.
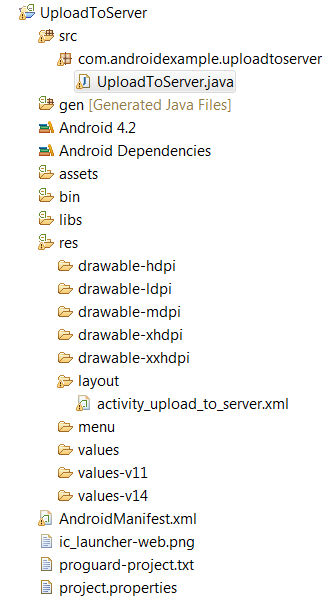
Project Structure :

 
Upload_file_project_sketch


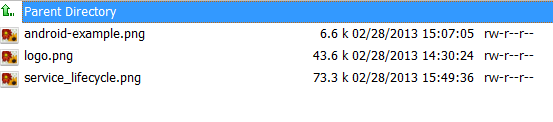
Upload Image Sdcard View :

 
Upload_image_sdcard_path

File : AndroidManifest.xml


<?xml version="1.0" encoding="utf-8"?>
  <manifest xmlns:android="http://schemas.android.com/apk/res/android"
      package="com.androidexample.uploadtoserver"
      android:versionCode="1"
      android:versionName="1.0" >
   
      <uses-sdk
          android:minSdkVersion="8"/>
       
      <uses-permission android:name="android.permission.INTERNET"/>
   
      <application
          android:allowBackup="true"
          android:icon="@drawable/ic_launcher"
          android:label="@string/app_name"
          android:theme="@style/AppTheme" >
          <activity
              android:name="com.androidexample.uploadtoserver.UploadToServer"
              android:label="@string/app_name" >
              <intent-filter>
                  <action android:name="android.intent.action.MAIN" />
   
                  <category android:name="android.intent.category.LAUNCHER" />
              </intent-filter>
          </activity>
      </application>
   
  </manifest>

File : res/layout/activity_upload_to_server.xml


<?xml version="1.0" encoding="utf-8"?>
 <LinearLayout xmlns:android="http://schemas.android.com/apk/res/android"
     android:orientation="vertical"
     android:layout_width="fill_parent"
     android:layout_height="fill_parent"
     >
     <Button
         android:layout_width="fill_parent"
         android:layout_height="wrap_content"
         android:text="Click To Upload File"
         android:id="@+id/uploadButton"
     />
       
     <TextView
         android:layout_width="fill_parent"
         android:layout_height="wrap_content"
         android:text=""
         android:id="@+id/messageText"
         android:textColor="#000000"
         android:textStyle="bold"
     />
  </LinearLayout>

File : src/UploadToServer.java


import java.io.DataOutputStream;
import java.io.File;
import java.io.FileInputStream;
import java.net.HttpURLConnection;
import java.net.MalformedURLException;
import java.net.URL;
import android.app.Activity;
import android.app.ProgressDialog;
import android.os.Bundle;
import android.util.Log;
import android.view.View;
import android.view.View.OnClickListener;
import android.widget.Button;
import android.widget.TextView;
import android.widget.Toast;
  
public class UploadToServer extends Activity {
     
    TextView messageText;
    Button uploadButton;
    int serverResponseCode = 0;
    ProgressDialog dialog = null;
        
    String upLoadServerUri = null;
     
    /**********  File Path *************/
    final String uploadFilePath = "/mnt/sdcard/";
    final String uploadFileName = "service_lifecycle.png";
     
    @Override
    public void onCreate(Bundle savedInstanceState) {
         
        super.onCreate(savedInstanceState);
        setContentView(R.layout.activity_upload_to_server);
          
        uploadButton = (Button)findViewById(R.id.uploadButton);
        messageText  = (TextView)findViewById(R.id.messageText);
         
        messageText.setText("Uploading file path :- '/mnt/sdcard/"+uploadFileName+"'");
         
        /************* Php script path ****************/
        upLoadServerUri = "http://www.androidexample.com/media/UploadToServer.php";
         
        uploadButton.setOnClickListener(new OnClickListener() {           
            @Override
            public void onClick(View v) {
                 
                dialog = ProgressDialog.show(UploadToServer.this, "", "Uploading file...", true);
                 
                new Thread(new Runnable() {
                        public void run() {
                             runOnUiThread(new Runnable() {
                                    public void run() {
                                        messageText.setText("uploading started.....");
                                    }
                                });                     
                           
                             uploadFile(uploadFilePath + "" + uploadFileName);
                                                      
                        }
                      }).start();       
                }
            });
    }
      
    public int uploadFile(String sourceFileUri) {
           
           
          String fileName = sourceFileUri;
  
          HttpURLConnection conn = null;
          DataOutputStream dos = null
          String lineEnd = "\r\n";
          String twoHyphens = "--";
          String boundary = "*****";
          int bytesRead, bytesAvailable, bufferSize;
          byte[] buffer;
          int maxBufferSize = 1 * 1024 * 1024;
          File sourceFile = new File(sourceFileUri);
           
          if (!sourceFile.isFile()) {
               
               dialog.dismiss();
                
               Log.e("uploadFile", "Source File not exist :"
                                   +uploadFilePath + "" + uploadFileName);
                
               runOnUiThread(new Runnable() {
                   public void run() {
                       messageText.setText("Source File not exist :"
                               +uploadFilePath + "" + uploadFileName);
                   }
               });
                
               return 0;
            
          }
          else
          {
               try {
                    
                     // open a URL connection to the Servlet
                   FileInputStream fileInputStream = new FileInputStream(sourceFile);
                   URL url = new URL(upLoadServerUri);
                    
                   // Open a HTTP  connection to  the URL
                   conn = (HttpURLConnection) url.openConnection();
                   conn.setDoInput(true); // Allow Inputs
                   conn.setDoOutput(true); // Allow Outputs
                   conn.setUseCaches(false); // Don't use a Cached Copy
                   conn.setRequestMethod("POST");
                   conn.setRequestProperty("Connection", "Keep-Alive");
                   conn.setRequestProperty("ENCTYPE", "multipart/form-data");
                   conn.setRequestProperty("Content-Type", "multipart/form-data;boundary=" + boundary);
                   conn.setRequestProperty("uploaded_file", fileName);
                    
                   dos = new DataOutputStream(conn.getOutputStream());
          
                   dos.writeBytes(twoHyphens + boundary + lineEnd);
                   dos.writeBytes("Content-Disposition: form-data; name="uploaded_file";filename=""
                                             + fileName + """ + lineEnd);
                    
                   dos.writeBytes(lineEnd);
          
                   // create a buffer of  maximum size
                   bytesAvailable = fileInputStream.available();
          
                   bufferSize = Math.min(bytesAvailable, maxBufferSize);
                   buffer = new byte[bufferSize];
          
                   // read file and write it into form...
                   bytesRead = fileInputStream.read(buffer, 0, bufferSize); 
                      
                   while (bytesRead > 0) {
                        
                     dos.write(buffer, 0, bufferSize);
                     bytesAvailable = fileInputStream.available();
                     bufferSize = Math.min(bytesAvailable, maxBufferSize);
                     bytesRead = fileInputStream.read(buffer, 0, bufferSize);  
                      
                    }
          
                   // send multipart form data necesssary after file data...
                   dos.writeBytes(lineEnd);
                   dos.writeBytes(twoHyphens + boundary + twoHyphens + lineEnd);
          
                   // Responses from the server (code and message)
                   serverResponseCode = conn.getResponseCode();
                   String serverResponseMessage = conn.getResponseMessage();
                     
                   Log.i("uploadFile", "HTTP Response is : "
                           + serverResponseMessage + ": " + serverResponseCode);
                    
                   if(serverResponseCode == 200){
                        
                       runOnUiThread(new Runnable() {
                            public void run() {
                                 
                                String msg = "File Upload Completed.\n\n See uploaded file here : \n\n"
                                              +" http://www.androidexample.com/media/uploads/"
                                              +uploadFileName;
                                 
                                messageText.setText(msg);
                                Toast.makeText(UploadToServer.this, "File Upload Complete.",
                                             Toast.LENGTH_SHORT).show();
                            }
                        });               
                   }   
                    
                   //close the streams //
                   fileInputStream.close();
                   dos.flush();
                   dos.close();
                     
              } catch (MalformedURLException ex) {
                   
                  dialog.dismiss(); 
                  ex.printStackTrace();
                   
                  runOnUiThread(new Runnable() {
                      public void run() {
                          messageText.setText("MalformedURLException Exception : check script url.");
                          Toast.makeText(UploadToServer.this, "MalformedURLException",
                                                              Toast.LENGTH_SHORT).show();
                      }
                  });
                   
                  Log.e("Upload file to server", "error: " + ex.getMessage(), ex); 
              } catch (Exception e) {
                   
                  dialog.dismiss(); 
                  e.printStackTrace();
                   
                  runOnUiThread(new Runnable() {
                      public void run() {
                          messageText.setText("Got Exception : see logcat ");
                          Toast.makeText(UploadToServer.this, "Got Exception : see logcat ",
                                  Toast.LENGTH_SHORT).show();
                      }
                  });
                  Log.e("Upload file to server Exception", "Exception : "
                                                   + e.getMessage(), e); 
              }
              dialog.dismiss();      
              return serverResponseCode;
               
           } // End else block
         }
}

Php script at server :

 File : UploadToServer.php


<?php
  
    $file_path = "uploads/";
     
    $file_path = $file_path . basename( $_FILES['uploaded_file']['name']);
    if(move_uploaded_file($_FILES['uploaded_file']['tmp_name'], $file_path)) {
        echo "success";
    } else{
        echo "fail";
    }
 ?>

Show uploaded image at server :


Showing_uploaded_file_at_server

Check apk file in phone  :

UploadToServer.apk
Read More

Thursday 5 September 2013

How to install external .apk file on android emulator

// siddhu vydyabhushana // 2 comments
To install an external APK on Android Virtual Deice (AVD) or on Emulator go through the following step-by-step procedure. 

Step-1:


Launch the emulator

Step-2:


Paste your APK file whichever you want to install on emulator in android-sdk-windows\platform-tools directory.

Step-3:


open cmd prompt and move to platform-tools folder of Android SDK directory.

Step-4:


Run the  following command:
adb install "xxx.apk"
Example: abd install "Indianlaws.apk" 
If Exists: If the emulator is already has that application it will give a failure notification to the user - [ INSTALL_FAILED_ALREADY_EXISTS ].

How to install .apk fiel on android emulator
Read More

Tuesday 3 September 2013

Internet Connection Status & Network Change Receiver example in android

// siddhu vydyabhushana // 1 comment
if you are developing an Android app you may already fetching information from internet. While doing so there is a chance that internet connection is not available on users handset. Hence its always a good idea to check the network state before performing any task that requires internet connection.
You might also want to check what kind of internet connection is available in handset. For example is wifi currently enabled? or is mobile data network is connected.

Check Internet Connection

Here is a simple code snippet that will help you identify what kind of internet connection a user has on her device.
First we need following permission in order to access network state. Add following permission to your AndroidManifest.xml file.
Permissions required to access network state:
<uses-permission android:name="android.permission.ACCESS_NETWORK_STATE" />
Now check following utility class NetworkUtil. It has method getConnectivityStatus which returns an int constant depending on current network connection. If wifi is enabled, this method will return TYPE_WIFI. Similarly for mobile data network is returns TYPE_MOBILE. You got the idea!!
There is also method getConnectivityStatusString which returns current network state as a more readable string.
NetworkUtil.java
package net.viralpatel.network;
import android.content.Context;
import android.net.ConnectivityManager;
import android.net.NetworkInfo;
public class NetworkUtil {
     
    public static int TYPE_WIFI = 1;
    public static int TYPE_MOBILE = 2;
    public static int TYPE_NOT_CONNECTED = 0;
     
     
    public static int getConnectivityStatus(Context context) {
        ConnectivityManager cm = (ConnectivityManager) context
                .getSystemService(Context.CONNECTIVITY_SERVICE);
        NetworkInfo activeNetwork = cm.getActiveNetworkInfo();
        if (null != activeNetwork) {
            if(activeNetwork.getType() == ConnectivityManager.TYPE_WIFI)
                return TYPE_WIFI;
             
            if(activeNetwork.getType() == ConnectivityManager.TYPE_MOBILE)
                return TYPE_MOBILE;
        }
        return TYPE_NOT_CONNECTED;
    }
     
    public static String getConnectivityStatusString(Context context) {
        int conn = NetworkUtil.getConnectivityStatus(context);
        String status = null;
        if (conn == NetworkUtil.TYPE_WIFI) {
            status = "Wifi enabled";
        } else if (conn == NetworkUtil.TYPE_MOBILE) {
            status = "Mobile data enabled";
        } else if (conn == NetworkUtil.TYPE_NOT_CONNECTED) {
            status = "Not connected to Internet";
        }
        return status;
    }
}
You can use this utility class in your android app to check the network state of the device at any moment.
Now this code will return you the current network state whenever the utility method is called. What if you want to do something in your android app when network state changes? Lets say when Wifi is disabled, you need to put your android app service to sleep so that it does not perform certain task. Now this is just one usecase. The idea is to create a hook which gets called whenever network state changes. And you can write your custom code in this hook to handle the change in network state.

Broadcast Receiver to handle changes in Network state

You can easily handle the changes in network state by creating your own Broadcast Receiver. Following is a broadcast receiver class where we handle the changes in network.
Check onReceive() method. This method will be called when state of network changes. Here we are just creating a Toast message and displaying current network state. You can write your custom code in here to handle changes in connection state.
NetworkChangeReceiver.java
package net.viralpatel.network;
import android.content.BroadcastReceiver;
import android.content.Context;
import android.content.Intent;
import android.widget.Toast;
public class NetworkChangeReceiver extends BroadcastReceiver {
    @Override
    public void onReceive(final Context context, final Intent intent) {
        String status = NetworkUtil.getConnectivityStatusString(context);
        Toast.makeText(context, status, Toast.LENGTH_LONG).show();
    }
}
Once we define our BroadcastReceiver, we need to define the same in AndroidMenifest.xml file. Add following to your menifest file.
<application  ...>
     ...
        <receiver
            android:name="net.viralpatel.network.NetworkChangeReceiver"
            android:label="NetworkChangeReceiver" >
            <intent-filter>
                <action android:name="android.net.conn.CONNECTIVITY_CHANGE" />
                <action android:name="android.net.wifi.WIFI_STATE_CHANGED" />
            </intent-filter>
        </receiver>
      ...
</application>
We defined our broadcast receiver class in menifest file. Also we defined two intent CONNECTIVITY_CHANGE and WIFI_STATE_CHANGED. Thus this will register our receiver for given intents. Whenever there is change in network state, android will fire these intents and our broadcast receiver will be called.
Below is complete AndroidMenifest.xml file.
AndroidMenifest.xml
<manifest xmlns:android="http://schemas.android.com/apk/res/android"
    package="net.viralpatel.network"
    android:versionCode="1"
    android:versionName="1.0" >
    <uses-sdk
        android:minSdkVersion="8"
        android:targetSdkVersion="15" />
    <uses-permission android:name="android.permission.ACCESS_NETWORK_STATE" />
    <application
        android:icon="@drawable/ic_launcher"
        android:label="@string/app_name"
        android:theme="@style/AppTheme" >
        <receiver
            android:name="net.viralpatel.network.NetworkChangeReceiver"
            android:label="NetworkChangeReceiver" >
            <intent-filter>
                <action android:name="android.net.conn.CONNECTIVITY_CHANGE" />
                <action android:name="android.net.wifi.WIFI_STATE_CHANGED" />
            </intent-filter>
        </receiver>
    </application>
</manifest>
Run this demo in android emulator or actual device.
When Wifi is enabled, you’ll see a Toast message with message.
                                                 android-network-change-broadcast-wifi-enabled  
Now disable Wifi. The toast message will show you message that internet connection is not available.
                                                android-network-change-broadcast-receiver-not-connected       
Now enable mobile data network. The same will be show in toast message as soon as you enable mobile data connection.
                                                 android-data-connection-broadcast-receiver

Download Source Code

Browse through the source code in following Git repository:
GitHub: https://github.com/viralpatel/android-network-change-detect-example
Download complete source code:
Download: android-network-change-detect-example.zip (376 KB)
Read More