Showing posts with label ajax. Show all posts

Wednesday 25 September 2013

JSF 2.0 Ajax Integration

// siddhu vydyabhushana // 1 comment
In JSF 2.0, coding Ajax is just like coding a normal HTML tag, it’s extremely easy. In this tutorial, you will restructure the last JSF 2.0 hello world example, so that, when the button is clicked, it will make an Ajax request instead of submitting the whole form.

1. JSF 2.0 Page

A JSF 2.0 xhtml page with Ajax support.
helloAjax.xhtml
<?xml version="1.0" encoding="UTF-8"?>
<!DOCTYPE html PUBLIC "-//W3C//DTD XHTML 1.0 Transitional//EN" 
"http://www.w3.org/TR/xhtml1/DTD/xhtml1-transitional.dtd">
<html xmlns="http://www.w3.org/1999/xhtml"
      xmlns:f="http://java.sun.com/jsf/core"      
      xmlns:h="http://java.sun.com/jsf/html">
 
    <h:body>
    	<h3>JSF 2.0 + Ajax Hello World Example</h3>
 
    	<h:form>
    	   <h:inputText id="name" value="#{helloBean.name}"></h:inputText>
    	   <h:commandButton value="Welcome Me">
    		 <f:ajax execute="name" render="output" />
    	   </h:commandButton>
 
    	   <h2><h:outputText id="output" value="#{helloBean.sayWelcome}" /></h2>	
    	</h:form>
 
    </h:body>
</html>
In this example, it make the button Ajaxable. When the button is clicked, it will make an Ajax request to the server instead of submitting the whole form.
<h:commandButton value="Welcome Me">
    <f:ajax execute="name" render="output" />
</h:commandButton>
<h:outputText id="output" value="#{helloBean.sayWelcome}" />
In the <f:ajax> tag :
  1. execute=”name” – Indicate the form component with an Id of “name” will be sent to the server for processing. For multiple components, just split it with a space in between, e.g execute=”name anotherId anotherxxId”. In this case, it will submit the text box value.
  2. render=”output” – After the Ajax request, it will refresh the component with an id of “output“. In this case, after the Ajax request is finished, it will refresh the <h:outputText> component.

    2. ManagedBean

    See the full #{helloBean} example.
    HelloBean.java
    package com.mkyong.common;
     
    import javax.faces.bean.ManagedBean;
    import javax.faces.bean.SessionScoped;
     
    import java.io.Serializable;
     
    @ManagedBean
    @SessionScoped
    public class HelloBean implements Serializable {
     
    	private static final long serialVersionUID = 1L;
     
    	private String name;
     
    	public String getName() {
    	   return name;
    	}
    	public void setName(String name) {
    	   this.name = name;
    	}
    	public String getSayWelcome(){
    	   //check if null?
    	   if("".equals(name) || name ==null){
    		return "";
    	   }else{
    		return "Ajax message : Welcome " + name;
    	   }
    	}
    }

    3. How it work?

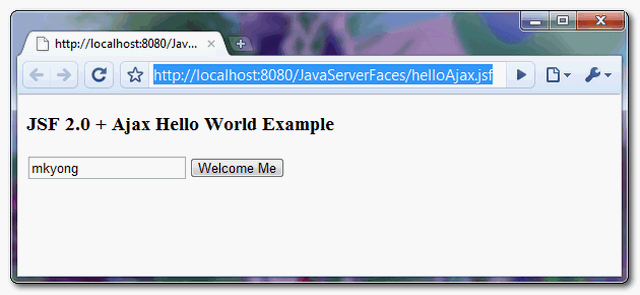
    Access the URL : http://localhost:8080/JavaServerFaces/helloAjax.jsf
    jsf2-ajax-hello-world-example-1
    When the button is clicked, it makes an Ajax request and pass the text box value to the server for processing. After that, it refresh the outputText component and display the value via getSayWelcome() method, without any “page flipping effect“.
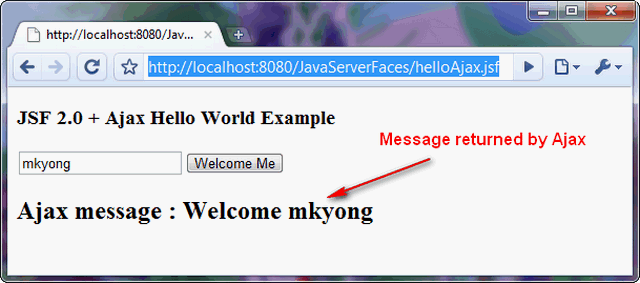
    jsf2-ajax-hello-world-example-2
    Add caption

    Download Source Code

    Download it – JSF-2-Ajax-Hello-World-Example.zip (8KB)
Read More

Wednesday 14 August 2013

Youtube like rating system in jsp using jquery

// siddhu vydyabhushana // 23 comments
Hi friends today am going to post youtube like rating system in jsp using jquery ,i hope you will like it. youtube is a one of the most famous video storage site many of the developers want to design , develop rating systems like youtube , so i wrote this article.

                                                 
                               DOWNLOAD      :click here
index.html
it contains two links like & dislike . when you click on like $(".selector").slidedown() will be called .
<body>
<div style="margin:50px">
<h1><a href="http://javatyro.blogspot.in">javatyro.blogspot.in</a></h1>
<a href="#" class="like" id="1" name="up">Like</a> -- <a href="#" class="like"
 id="1" name="down">Dislike</a>
<div id="votebox">
<span id='close'><a href="#" class="close" title="Close This">X</a></span>
<div style="height:13px">
<div id="flash">Loading........</div>
</div>
<div id="content">
</div>
javascript code:
$(document).ready(function()
{
$(".like").click(function()
{
var id=$(this).attr("id");
var name=$(this).attr("name");
var dataString = 'id='+ id + '&name='+ name;
$("#votebox").slideDown("slow");
$("#flash").fadeIn("slow");
$.ajax
({
type: "POST",
url: "rating.jsp",
data: dataString,
cache: false,
success: function(html)
{
$("#flash").fadeOut("slow");
$("#content").html(html);
} 
});
});
$(".close").click(function()
{
$("#votebox").slideUp("slow");
});
});
css code:
body
{
font-family:Arial, Helvetica, sans-serif;
font-size:13px;

}
a
{
text-decoration:none
}
a:hover
{
text-decoration:none

}
#votebox
{
border:solid 1px #dedede; padding:3px;
display:none;
padding:15px;
width:700px;
-moz-border-radius: 6px;
-webkit-border-radius: 6px;
}
.close
{
color:#333
}


#greebar
{
float:left;
background-color:#aada37;
border:solid 1px #698a14;
width:0px;
height:12px;
}
#redbar
{
float:left;
background-color:#cf362f;
border:solid 1px #881811;
width:0px;
height:12px;
}
#flash
{
display:none;
font-size:10px;
color:#666666;
}
#close
{
float:right; font-weight:bold; padding:3px 5px 3px 5px; border:solid 1px #333;
-moz-border-radius: 6px;
-webkit-border-radius: 6px;
}
h1
{
font-family:'Georgia', Times New Roman, Times, serif;
font-size:36px;
color:#333333;
}
rating.jsp:
<%@page import="java.sql.*"%>
<%
if(request.getParameter("id")!=null)
{
int id=Integer.parseInt(request.getParameter("id"));
int val,valb,total=0,up_per=0,down_per=0,up_value=0,down_value=0;
String name=request.getParameter("name");
try
{
Class.forName("sun.jdbc.odbc.JdbcOdbcDriver");
Connection con=DriverManager.getConnection("jdbc:odbc:youtube");
if(name.equals("up")==true)
{
Statement stmt=con.createStatement();
ResultSet rs=stmt.executeQuery("select * from messages where id="+id+" ");
rs.next();
val=rs.getInt(3)+1;
Statement stmt1=con.createStatement();
stmt1.executeUpdate("update messages set up="+val+" where id="+id+" ");
}
else
{
Statement stmt=con.createStatement();
ResultSet rs=stmt.executeQuery("select * from messages where id="+id+" ");
rs.next();
val=rs.getInt(4)+1;
Statement stmt1=con.createStatement();
stmt1.executeUpdate("update messages set down="+val+" where id="+id+" ");
}

Statement stmt2=con.createStatement();
ResultSet rs1=stmt2.executeQuery("select * from messages where id="+id+" ");
rs1.next();
up_value=rs1.getInt(3);
down_value=rs1.getInt(4);
total=up_value+down_value;
up_per=(up_value*100)/total;
down_per=(down_value*100)/total;

%>
<div style="margin-bottom:10px">
<b>Ratings for this blog</b> ( <%=total%> total)
</div>
<table width="700px">

<tr>
<td width="30px"></td>
<td width="60px"><%=up_value %></td>
<td width="600px"><div id="greebar" style="width:<%=up_per %>%"></div></td>
</tr>

<tr>
<td width="30px"></td>
<td width="60px"><%=down_value %></td>
<td width="600px"><div id="redbar" style="width:<%=down_per%>%"></div></td>
</tr>

</table>

<%
con.close();
}
catch(Exception e)
{
out.println(e);
}
}
%>

Your like and shares make me more happy thanq....  
 database image:
 
                               DOWNLOAD      :click here
Read More

Saturday 10 August 2013

Fllicker like title edit using java

// siddhu vydyabhushana // 25 comments
Flicker like title edit using java, jquery, jsp, is quite little bit confusing so i am interested to teach you something which i know, i hope you like it.same post you can find it in 9lessons in php


                     Download: click here
java script code:
$(function() 
{

$("h4").click(function() 
{
var titleid = $(this).attr("id");
var sid=titleid.split("title");
var id=sid[1];
var dataString = 'id='+ id ;
var parent = $(this).parent();
$(this).hide();
$("#formbox"+id).show();
return false;
});
 
$(".save").click(function() 
{
var A=$(this).parent().parent();
var X=A.attr('id');
var d=X.split("formbox");
var id=d[1];
var Z=$("#"+X+" input.content").val();
var dataString = 'id='+ id +'&title='+Z ;
$.ajax({
type: "POST",
url: "imageajax.jsp",
data: dataString,
cache: false,
success: function(data)
{
A.hide(); 
$("#title"+id).html(Z); 
$("#title"+id).show(); 
}
});
return false;
});
$(".cancel").click(function() 
{
var A=$(this).parent().parent();
var X= A.attr("id");
var d=X.split("formbox");
var id=d[1];
var parent = $(this).parent();
$("#title"+id).show();
A.hide();
return false;
}); 
});
css code:
#container
{
margin:0 auto;
width:900px;
font-family:Arial, Helvetica, sans-serif;

}
td
{
width:100px;
}
h4
{
margin:0px;
padding:0px;
}
h4:hover
{
background-color:#ffffcc;
}
.save
{
background-color:#cc0000;
color:#fff;
padding:4px;
font-size:11px;
border:solid 1px #cc0000;
text-weight:bold;
-moz-border-radius:5px;-webkit-border-radius:5px;
}
.cancel
{
background-color:#dedede;
color:#333;
padding:4px;
font-size:11px;
border:solid 1px #dedede;
-moz-border-radius:5px;-webkit-border-radius:5px;
}
database images

 
imageajax.jsp:
<%@page import="java.sql.*"%>
<%
if(request.getParameter("id")!=null)
{
int id=Integer.parseInt(request.getParameter("id"));
String title=request.getParameter("title");
try{
Class.forName("sun.jdbc.odbc.JdbcOdbcDriver");
Connection con=DriverManager.getConnection("jdbc:odbc:flicker");
Statement stmt=con.createStatement();
stmt.executeQuery("update images set title='"+title+"' where id="+id+" ");
con.close();
}
catch(Exception e)
{
out.println(e);
}
}
%>
databse after update:


your likes, shares make me more happy
 
Read More

Wednesday 7 August 2013

Facebook like Autosuggestion with jQuery, Ajax and JAVA

// siddhu vydyabhushana // 7 comments
Facebook like auto suggestion with jquey, ajax with jsp also developed by 9lessons in php i never found this tutorial in java o jasp anywhere and i got many requests from users who are reading frequently.I lhope you like it.Automatically  based on the query you search the values will be listed.

  
                           Download Script:   Download File


Database: Actually i used ms access to connect with jsp,if you use mysql or oracle below code useful
CREATE TABLE test_user_data
(
uid INT AUTO_INCREMENT PRIMARY KEY,
fname VARCHAR(25),
lname VARCHAR(25),
country VARCHAR(25),
img VARCHAR(50)
);
index.html
<script type="text/javascript" src="jquery.js"></script>
<script type="text/javascript" src="jquery.watermarkinput.js"></script>
<script type="text/javascript">
$(document).ready(function(){

$(".search").keyup(function() 
{
var searchbox = $(this).val();
var dataString = 'searchword='+ searchbox;

if(searchbox=='')
{
}
else
{

$.ajax({
type: "POST",
url: "search.jsp",
data: dataString,
cache: false,
success: function(html)
{

$("#display").html(html).show();
	
	
	}
});
}return false;    


});
});

jQuery(function($){
   $("#searchbox").Watermark("Search");
   });
</script>
Search.jsp: it displays results
<%@page import ="java.sql.*"%>
<%
if(request.getParameter("searchword")!=null)
{
String q=request.getParameter("searchword");
try
{
Class.forName("sun.jdbc.odbc.JdbcOdbcDriver");
Connection con=DriverManager.getConnection("jdbc:odbc:auto");
Statement stmt=con.createStatement();
ResultSet rs=stmt.executeQuery("select * from test_user_data where fname like '%"+q+"%' or lname like '%"+q+"%'  ");
while(rs.next())
{
String fname=rs.getString(2);
String lname=rs.getString(3);
String img=rs.getString(5);
String country=rs.getString(4);
%>
<div class="display_box" align="left">
<img src="user_img/<%=img%>" style="width:25px; float:left; margin-right:6px" /><%=fname%> <%=lname%><br/>
<span style="font-size:9px; color:#999999"><%=country%></span></div>
<%
}
con.close();
}
catch(Exception e)
{
out.println(e);
}
}
else
{
out.println("wrong");
}
%>
Css code: for simple and nice user interface
body
{
font-family:"Lucida Sans";
}
*
{
margin:0px
}
#searchbox
{
width:250px;
border:solid 1px #000;
padding:3px;
}
#display
{
width:250px;
display:none;
float:right; margin-right:30px;
border-left:solid 1px #dedede;
border-right:solid 1px #dedede;
border-bottom:solid 1px #dedede;
overflow:hidden;
}
.display_box
{
padding:4px; border-top:solid 1px #dedede; font-size:12px; height:30px;
}
.display_box:hover
{
background:#3b5998;
color:#FFFFFF;
}
#shade
{
background-color:#00CCFF;
}
Read More

Tuesday 6 August 2013

Live Table Edit with Jquery ,Ajax and Java

// siddhu vydyabhushana // 3 comments
Very thankful to srinivas tamada for writing this post already he did live table edit in php but now am going to teach you how to do this in pure java.i hope you like it .Lets start...

                            Download this code:  click here
Database:
i took a single table named fullnames columns is,firstname,lastname


CREATE TABLE fullnames
(
id INT PRIMARY KEY AUTO_INCREMENT,
firstname VARCHAR(70),
lastname VARCHAR(70)
);

wireframe:
index.jsp : For displaying records


<table width="100%">
<tr class="head">
<th>First Name</th><th>Last Name</th>
</tr>
<%
try
{
Class.forName("sun.jdbc.odbc.JdbcOdbcDriver");
Connection con=DriverManager.getConnection("jdbc:odbc:edit","","");
Statement stmt=con.createStatement();
ResultSet rs=stmt.executeQuery("select * from fullnames");
int i=1;
while(rs.next())
{
int id=rs.getInt(1);
String firstname=rs.getString(2);
String lastname=rs.getString(3);
if(i%2==0)
{
%>
<tr id="<%=id%>" class="edit_tr">
<% 
} 
else 
{ %>
<tr id="<%=id%>" bgcolor="#f2f2f2" class="edit_tr">
<% } %>
<td width="50%" class="edit_td">
<span id="first_<%=id%>" class="text"><%=firstname %></span>
<input type="text" value="<%=firstname%>" class="editbox" id="first_input_<%=id%>" />
</td>
<td width="50%" class="edit_td">
<span id="last_<%=id%>" class="text"><%=lastname%></span> 
<input type="text" value="<%=lastname%>"  class="editbox" id="last_input_<%=id %>"/>
</td>
</tr>

<%
i++;
}
con.close();
}
 catch(Exception e)
 {
 out.println(e);
 }
%>

</table>

Javascript Code:
<script type="text/javascript" src="jquery.min.js"></script>
<script type="text/javascript">
$(document).ready(function()
{
$(".edit_tr").click(function()
{
var ID=$(this).attr('id');
$("#first_"+ID).hide();
$("#last_"+ID).hide();
$("#first_input_"+ID).show();
$("#last_input_"+ID).show();
}).change(function()
{
var ID=$(this).attr('id');
var first=$("#first_input_"+ID).val();
var last=$("#last_input_"+ID).val();
var dataString = 'id='+ ID +'&firstname='+first+'&lastname='+last;
$("#first_"+ID).html('<img src="load.gif" />');


if(first.length && last.length>0)
{
$.ajax({
type: "POST",
url: "table_edit_ajax.jsp",
data: dataString,
cache: false,
success: function(html)
{

$("#first_"+ID).html(first);
$("#last_"+ID).html(last);
}
});
}
else
{
alert('Enter something.');
}
});

$(".editbox").mouseup(function() 
{
return false
});

$(document).mouseup(function()
{
$(".editbox").hide();
$(".text").show();
});

});
</script>
css code:
 
body
{
font-family:Arial, Helvetica, sans-serif;
font-size:14px;
}
.editbox
{
display:none
}
td
{
padding:7px;
}
.editbox
{
font-size:14px;
width:270px;
background-color:#ffffcc;
border:solid 1px #000;
padding:4px;
}
.edit_tr:hover
{
background:url(edit.png) right no-repeat #80C8E5;
cursor:pointer;
}
th
{
font-weight:bold;
text-align:left;
padding:4px;
}
.head
{
background-color:#333;
color:#FFFFFF
}
I connected jsp to ms access database after downloading this code you have to set data source name path and place it in webapps folder of apache run it . even though if have any doubts comment here i will clarify it. mail me vydyas@gmail.com
Read More

Saturday 23 March 2013

Blogger Widget: AJAX Navigation Menu Widget for Blogger

// siddhu vydyabhushana // Leave a Comment

After so long time almost two months, i am here with awesome new blogger widget. It is very hard to manage the works and blogs simultaneously. But still love to give the new blogger widgets and tips.
AJAX Navigation menu for blogger is very new widget created by Me in Blogger platform that uses Blogger JSON feed API and AJAX. This navigation menu is inspired from Mashable.com old site. I coded this widget some months ago, but there is no time for publishing this article. And now i recoded and improved this widget and added customizable features.

HOW IT WORKS ?

Well, this widget is works based on jQuery library and Blogger JSON feed API. Your blog must be for Public visitors. other wise the Blogger JSON Feed API won’t works.
The menu is works just like normal drop-down menu when javascript is disabled, And it will turns to AJAX powered drop-down menu when javascript is enabled.

HOW TO INSTALL THIS WIDGET?

  1. Go to Blogger Dashboard > Select the Blog > Go to Template page of the Blog
  2. Click Edit HTML button

THE CSS

Add the Following CSS Code before ]]></b:skin>
/* Menu Stylings */
.w2bmenu *{margin: 0;padding: 0;}
ul.w2bmenu {list-style: none;line-height: 1;overflow: visible !important;}
ul.w2bmenu:after{margin: 0;padding: 0;content: ' ';display: block;height: 0px;clear: both;}
ul.w2bmenu li{list-style: none;position:relative;float: left;margin: 0 !important;padding: 0 !important;}
ul.w2bmenu li a{margin: 0;padding: 12px 16px !important;font-family: 'Helvetica Neue', Arial, Helvetica, sans-serif !important;color: #6b6b6b !important;text-shadow: 0 1px 0 #fff;font-weight: 700 !important;text-transform: uppercase !important;font-size: 12px !important;display: block !important;border: 0 none !important;}
ul.w2bmenu li a:hover,ul.w2bmenu li a.hoverover{background: #f5f5f5 !important;}
ul.w2bmenu ul{position: absolute;display: none;top: 100%;border:1px solid #ccc;}
ul.w2bmenu li:hover > ul{display: block;}
ul.w2bmenu ul li{float: none;min-width: 160px;background:#f5f5f5;text-shadow: none;}
ul.w2bmenu ul li a{padding: 12px 14px;text-transform: none;font-weight: normal;}
ul.w2bmenu ul li a:hover,ul.w2bajaxmenu ul li a.hoverover{background: #fff !important;}
ul.w2bmenu ul ul{display: none;left: 100%;top: 0;}
/* AJAX Menu Stylings */
ul.w2bajaxmenu li div.submenu {display: none;position: absolute;width: 600px;z-index: 90;left: -1px;top: 100%;overflow: hidden;min-height: 150px;background: #fff;border:1px solid #cccccc;border-top: 0 none;}
ul.w2bajaxmenu li:hover div.submenu {display: block;}
ul.w2bajaxmenu ul ,ul.w2bajaxmenu ul li{display: block !important;border: 0 none !important;margin: 0 !important;padding:0 !important;}
ul.w2bajaxmenu ul li{background: none !important;float: none !important;}
ul.w2bajaxmenu ul.verticlemenu{position: absolute;width: 33%;left:0;top:0;bottom: 0;background: #f5f5f5;}
ul.w2bajaxmenu ul.postslist {position: relative;display: block;width:65%;float: right;margin: 8px 0 !important;background: none;}
ul.w2bajaxmenu ul.postslist li{display: block;overflow: hidden;border-bottom: 1px #eee solid;position: relative;min-height: 60px;padding: 8px 8px 8px 110px !important;}
ul.w2bajaxmenu ul.postslist li:last-child{border-bottom: none 0;}
ul.w2bajaxmenu ul.postslist li .imgCont{position: absolute;left: 0;top:8px;width: 100px;height: 60px;overflow: hidden;border:1px solid #dcdcdc;font-size: 0;line-height: 0;}
ul.w2bajaxmenu ul.postslist li .imgCont img{position: relative;top:-20px;padding: 0;width: 100px;height: 100px;display: block;}
ul.w2bajaxmenu ul.postslist li a{display: block;line-height: 1.4;padding: 0 !important;}
ul.w2bajaxmenu .loader{background:url('http://i.imgur.com/SeivG.gif') no-repeat scroll 0 0 transparent;width:22px;height:22px;position: absolute;top:50%;margin-top: -11px;right:5px;}
ul.w2bajaxmenu .menuArrow {border-bottom: 4px solid transparent;border-top: 4px solid transparent;border-left: 4px solid #999999;display: block;height: 0;margin-top: -4px;position: absolute;right: 11px;top: 50%;width: 0;}
#w2bajaxmenu {background: #ededed;background: -moz-linear-gradient(top, #ededed 0%, #e0e0e0 100%);background: -webkit-gradient(linear, left top, left bottom, color-stop(0%,#ededed), color-stop(100%,#e0e0e0));background: -webkit-linear-gradient(top, #ededed 0%,#e0e0e0 100%);background: -o-linear-gradient(top, #ededed 0%,#e0e0e0 100%);background: -ms-linear-gradient(top, #ededed 0%,#e0e0e0 100%);background: linear-gradient(to bottom, #ededed 0%,#e0e0e0 100%);filter: progid:DXImageTransform.Microsoft.gradient( startColorstr='#ededed', endColorstr='#e0e0e0',GradientType=0 );border: 1px solid #cccccc;}

THE JAVASCRIPT

If your Blog has jQuery plugin, then don’t add this plugin in your blog template,
Otherwise add the below line of code before  </head> tag
<script type="text/javascript" src="http://ajax.googleapis.com/ajax/libs/jquery/1.8.2/jquery.min.js"></script>
Add the following Javascript code before  </head> tag
<script type="text/javascript" src="http://widgets.way2blogging.org/blogger-widgets/ajaxbloggermenu.min.js"></script>
<script type="text/javascript">
jQuery(document).ready(function($) {
$('#w2bajaxmenu').ajaxBloggerMenu({
numPosts : 4, // Number of Posts to show
defaultImg : 'http://url-to-image.com/default-image.jpeg' // Default thumbnail Image
});
});
</script>

THE HTML

In this section you should be carefully add the HTML, otherwise it won’t works.
The AJAX Menu accepts three types of urls. You must use this urls only in the menu. They are Label,Search Query and Label w/ Search Query.
Label URLhttp://yourblogdomain.blogspot.com/search/label/LABELNAME
Search Queryhttp://yourblogdomain.blogspot.com/search?q=SEARCHQUERY
Label w/ Search Queryhttp://yourblogdomain.blogspot.com/search/label/LABELNAME?q=SEARCHQUERY
Note:- Search Query must be Url encoded. You can use this tool to encode your search query.
Use this MENU Example code and add it in HTML/JavaScript gadget.
<ul id="w2bajaxmenu" class="w2bmenu">
<li>
<a href="#">Home</a>
</li>
<li>
<a href="#">Example 1</a>
<ul>
<li><a href="http://yourblogdomain.blogspot.com/search/label/AdSense">Sample Label</a></li>
<li><a href="http://yourblogdomain.blogspot.com/search/label/Gadgets?q=harish">Label w/ Search</a></li>
<li><a href="http://yourblogdomain.blogspot.com/search?q=way2blogging">Search Query</a></li>
<li><a href="http://yourblogdomain.blogspot.com/search?q=This+is+long+query+you+do+not+get+any+results,+so+try+others">Unknown Search</a>
</ul>
</li>
<li>
<a href="#">Example 2</a>
<ul>
<li><a href="http://yourblogdomain.blogspot.com/search/label/Design">Design</a></li>
<li><a href="http://yourblogdomain.blogspot.com/search/label/Facebook?q=Like+Button">Facebook</a></li>
<li><a href="http://yourblogdomain.blogspot.com/search/label/Templates">Templates</a></li>
<li><a href="http://yourblogdomain.blogspot.com/search?q=Guest+Posts">Guest Posts</a></li>
</ul>
</li>
<li><a href="http://yourblogdomain.blogspot.com">Normal Link</a></li>
</ul>
Read More